How to Make Pixel Art in Photoshop: Step-by-Step Guide
Make cleaner pixel art in Photoshop without soft edges, muddy color, or blurry export.
Learn how to make pixel art in Photoshop with a practical workflow for resizing cleanly, preserving hard edges, reducing colors, and exporting without blur.
Updated March 2026 by Pixel Art Village Team.
If you want to learn how to make pixel art in Photoshop, the biggest mistake is treating it like a one-click filter. Cleaner pixel art comes from a simpler workflow: start with the right image, resize it the right way, preserve hard edges, reduce unnecessary colors, and export without adding blur.
If you want a faster browser-based workflow while you compare results, try the Image to Pixel Art Converter. For a simpler browser walkthrough, read How to Pixelate an Image Online. If your result already looks soft or muddy, How to Fix a Pixelated Image That Looks Blurry or Muddy is a useful companion guide. If you are comparing Photoshop against other options, see Best Pixel Art Converters Compared (2025).
Quick answer: How to pixelate an image in Photoshop
If you specifically want to know how to pixelate an image in Photoshop, the short version is simple: resize the image with `Nearest Neighbor (Hard Edges)`, reduce the visual detail, tighten the palette, avoid soft anti-aliasing where possible, and export as `PNG`.
That workflow works because it protects the blocky structure that makes pixel art feel crisp instead of blurred.
What makes an image look like pixel art?
A pixel art image usually feels intentional because it keeps the main shapes readable at a small size, uses hard edges instead of soft blended transitions, and limits detail and color so the final image feels designed rather than simply shrunk.
That is why simply making an image smaller in Photoshop does not automatically create a pixel art look. If Photoshop smooths the image during resizing, the result often looks blurry instead of crisp.
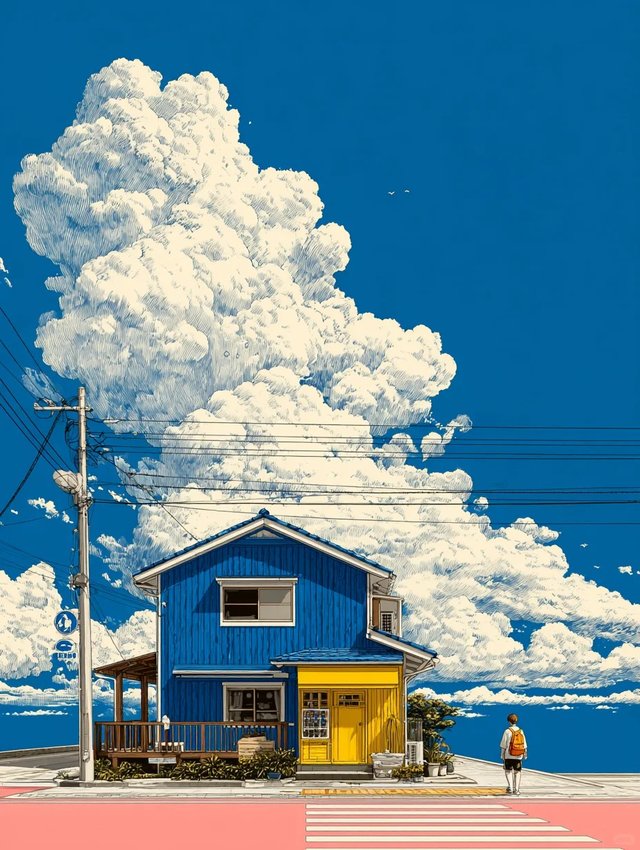
Step 1: Start with the right source image
- Choose a source image with one clear subject and readable lighting.
- Avoid images with too many tiny details or a busy background.
- Crop the composition first if the subject does not stand out clearly.
A good source image makes every later step easier. If the original image is messy, the final pixel art usually feels messy too.
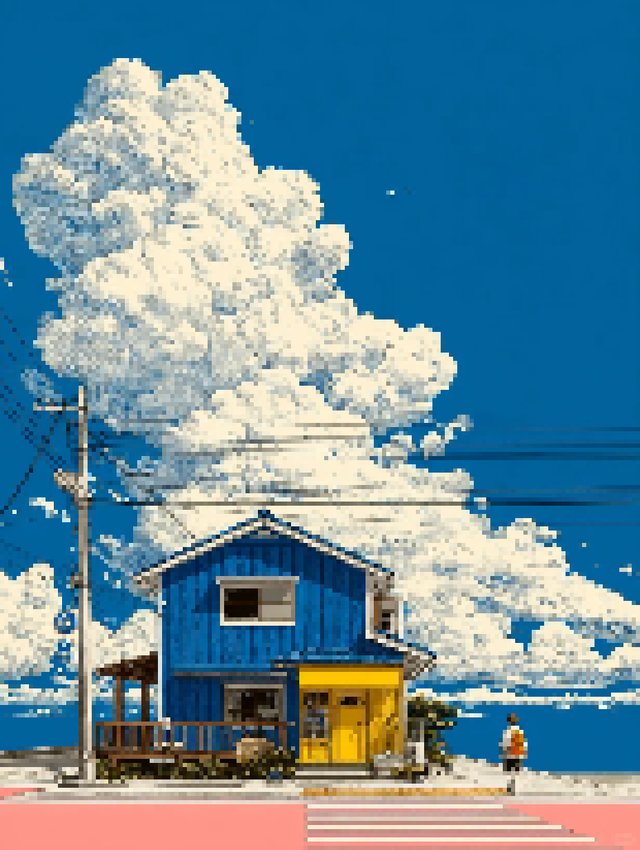
Step 2: Resize the image the right way
This is the most important Photoshop step. Go to `Image > Image Size` and make sure the resampling method uses `Nearest Neighbor (Hard Edges)`. In plain English, this tells Photoshop to keep square pixel edges instead of smoothing them.
A practical workflow looks like this:
- Open your image
- Crop it if needed
- Go to `Image Size`
- Reduce the width and height
- Set resample to `Nearest Neighbor (Hard Edges)`
- Preview the result at actual size
Do not worry about getting the size perfect on the first try. Test a few versions until the main subject still reads clearly.
Step 3: Reduce detail before adding effects
Many people make the same mistake here: they start pushing contrast, sharpening, or filters before the image structure is ready.
Ask one simple question first: can you still recognize the subject clearly at this size? If the answer is no, the fix is usually not more effects. The fix is usually a tighter crop, a slightly larger output size, or a better source image.
Pixel art gets stronger when the big shapes work first.
Step 4: Limit the colors
One reason a Photoshop result can look like a blurry thumbnail instead of pixel art is that it keeps too many colors. Real pixel art usually feels cleaner because the palette is more controlled.
- Start with fewer colors than you think you need.
- Only add colors back if important parts disappear.
- Use color reduction to simplify the image before trying extra sharpening.
For many images, a smaller palette creates a stronger retro look than extra sharpening ever will.
Step 5: Turn off anti-aliasing where it hurts pixel edges
Anti-aliasing means Photoshop softens edges to make curves and diagonals look smoother. That can help in normal design work, but in pixel art it often weakens the blocky look you want.
If you are editing the image manually, check tools and settings that may add soft edges:
- text tools
- selection tools
- shape tools
- brush-based cleanup
For pixel-level cleanup, the `Pencil Tool` is often a better fit than a soft brush because it keeps hard edges.
Step 6: Clean up the final image by hand
After resizing and color simplification, zoom in and look at the problem areas first:
- faces
- outlines
- high-contrast edges
- noisy background details
A few manual fixes on the silhouette, face, or outline often improve the result more than another round of automated effects.
Step 7: Export without losing sharpness
Once the image looks right, export it in a format that keeps the edges clean. In most cases, `PNG` is the safest choice for pixel art because it preserves hard edges better than lossy formats.
Before you export, double-check:
- the final dimensions
- whether the image still looks clean at actual use size
- whether the export settings add unexpected blur or compression
It is also worth testing the exported file outside Photoshop. Sometimes an image looks fine in the editor but weaker in the place where it will actually be used.
Common mistakes when making pixel art in Photoshop
1. Using the wrong resize method
If you resize with a smoothing method instead of `Nearest Neighbor (Hard Edges)`, the image often turns soft immediately.
2. Keeping too much detail
If the original image is too complex, the result will often look muddy. Pixel art usually needs simplification.
3. Keeping too many colors
Too many colors can make the image feel more like a compressed photo than a designed pixel art piece.
4. Using blur or sharpening as a shortcut
These effects can help in small amounts, but they rarely fix a weak base image.
5. Exporting carelessly
Even a good result can look worse if the export settings or later compression soften the edges.
Photoshop vs an online pixel art converter
Photoshop is powerful when you want manual control, layered editing, or detailed cleanup. But it is not always the fastest way to test pixel art settings.
A browser-based workflow can be better when you want to:
- compare multiple pixel sizes quickly
- test palette changes faster
- avoid a heavy editing workflow
- keep processing simple and private in the browser
If that sounds closer to what you need, try the Image to Pixel Art Converter and compare it with your Photoshop result.
FAQ
Can Photoshop make real pixel art?
Yes. Photoshop can help you make pixel art if you control resizing, edge sharpness, and color reduction carefully. The result depends more on workflow choices than on filters.
How do I pixelate an image in Photoshop?
Resize it with `Nearest Neighbor (Hard Edges)`, keep the composition simple, reduce unnecessary colors, and export the final image as `PNG` so the edges stay clean.
Why does my Photoshop pixel art still look blurry?
The most common reasons are the wrong resize method, too much original detail, too many colors, or edge smoothing from anti-aliasing.
What is the best resize method for pixel art in Photoshop?
In most cases, `Nearest Neighbor (Hard Edges)` is the best place to start because it preserves blocky pixel edges instead of smoothing them.
Should I reduce colors before or after resizing?
Usually resize first, then reduce colors. It is easier to judge which details matter after the image reaches the rough target size.
Is Photoshop better than an online pixel art converter?
Not always. Photoshop gives you more manual control, but online tools are often faster for testing size, palette, and conversion settings.
Final thoughts
If you want cleaner pixel art in Photoshop, focus on the fundamentals first: choose a strong source image, resize with hard edges, simplify the detail, reduce the color count, and export carefully. The goal is not to preserve every part of the original photo. The goal is to create a result that looks intentional at a small size.
If you want a faster way to test settings before doing manual cleanup, try the Image to Pixel Art Converter and compare the output with your Photoshop version.
Related Articles
Best Pixel Art Converters Compared (2025): Which Tool Fits Your Workflow?
Compare pixel art converters by privacy, control, ease of use, and output quality to find the right fit for photos, sprites, and retro-style artwork.
How to Turn a Photo Into Pixel Art: SNES-Style Workflow
Turn a photo into pixel art with a practical SNES-style workflow that simplifies shapes, limits the palette, and keeps the final image readable.